How To Make a Colour Scheme Generator Using The Color API

I am a Web3 Developer and Technical Writer from India. I love to write about the things I learn and understand. I believe that being serious is not required as long as one is sincere. I thus tend to have fun in everything that I do.
Introduction
If you are a designer and/or a web developer, I'm sure you've racked your head deciding a colour scheme for your project. Don't you wish something could tell you exactly what colours you needed? Something that could find that perfect combination? I mean you could always use someone else's colour scheme generator but where's the fun in that? In this blog, I'll show you how I created (and deployed) such a thing myself, with the power of HTML, CSS, JSS and, most importantly, The Color API!
Setting Up the Project
Make a new folder in your system and make three new files:
- index.html
- styles.css
- index.js
That's all we need for setting up the project and now we can jump right into the development part!
HTML "Programming" (if you know, you know 😆)
We need to set up a basic structure for our webpage. It's a pretty small app but there are some things we need to decide first:
- Do we want to provide all of the available space to our generator ?
- Should we make it dark themed or light themed?
- Do we want to be a square or a rectangle
I decided that I want it to be in the centre of the screen, taking up some amount of the available space but not all. I like dark themes so I decided that's what I'll go ahead with and I made it rectangular in shape. This is what my index.html file ended up looking like:
<!DOCTYPE html>
<html>
    <head>
        <title>Colour Scheme Generator</title>
        <meta charset="utf-8">
        <meta name="viewport" content="width=device-width, initial-scale=1.0"/>
        <link href="styles.css" rel="stylesheet" type="text/css"/>
    </head>
    <body>
        <div id="mainthing">
            <div id="huh">
                <form id="thisform"><div></div>
                    <input class="form-item" type="color" id="seed-color" value="#40BBD4"/>
                    <select class="form-item form-item-not-first" name="scheme" id="color-scheme">
                        <option>Monochrome</option>
                        <option>Monochrome-dark</option>
                        <option>Monochrome-light</option>
                        <option>Analogic</option>
                        <option>Complement</option>
                        <option>Analogic-complement</option>
                        <option>Triad</option>
                    </select>
                    <input type="button" value="Get colour scheme" class="form-item-not-first" id="crow"/>
                </form>
            </div>
            <div id="sometext">(click to copy hex code)</div>
            <div id="heh">
                <div class="colors" id="c0"></div>
                <div class="colors" id="c1"></div>
                <div class="colors" id="c2"></div>
                <div class="colors" id="c3"></div>
                <div class="colors" id="c4"></div>
            </div>
            <div id="hah">
                <div class="hex" id="h0"></div>
                <div class="hex" id="h1"></div>
                <div class="hex" id="h2"></div>
                <div class="hex" id="h3"></div>
                <div class="hex" id="h4"></div>

            </div>
        </div>
        <script src="index.js"></script>
    </body>
</html>
For displaying the colours, I've intentionally named the ids of the placeholders: c0, c1, c2, c3, c4 (the areas where the colours will be displayed) and h0, h1, h2, h3, h4 (the areas where the hex values of the colours will be displayed). This will help us later on in our JavaScript code as we'll use a "for" loop to show the colours and their hex codes on the screen.
I've added the <script> tag towards the end so that our JavaScript file doesn't load before all the elements in our index.html get rendered.
Let's give everything a border of 5px and a padding of 10px just to see what it looks like:
*{
    border:5px solid darkred;
    padding: 10px;
    background-color: rgb(43, 43, 43);
    color:rgb(252, 252, 252);
}
You should be getting something like this:
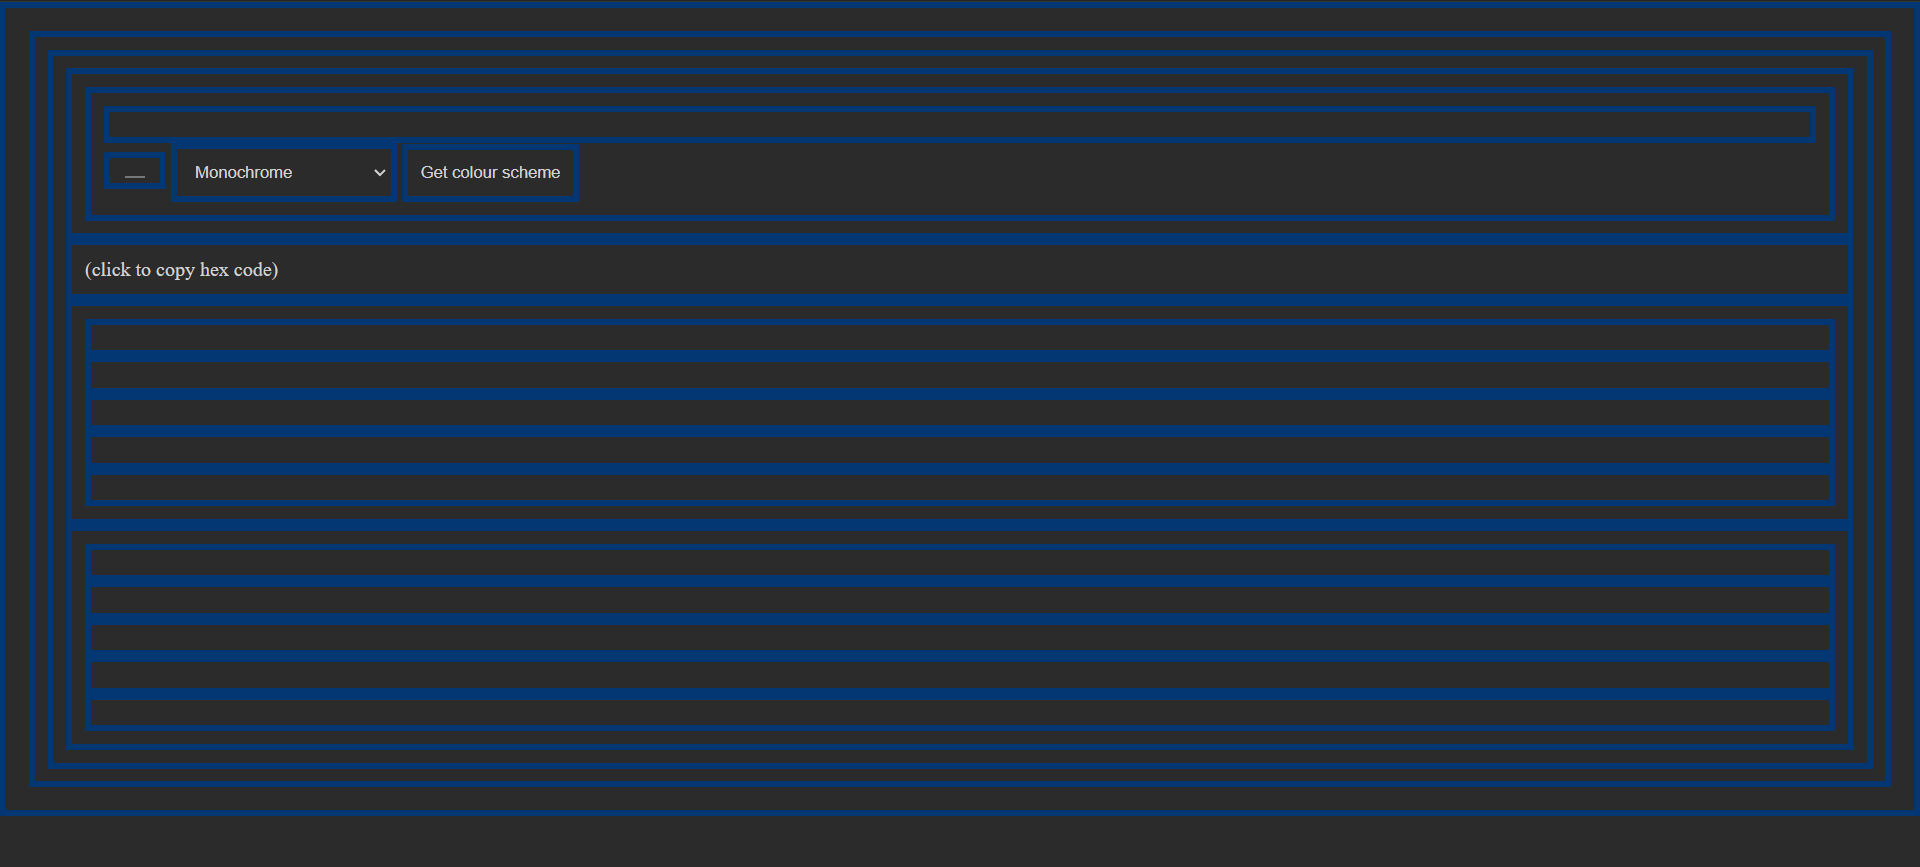
And just like that we have completed laying the foundation to our colour scheme generator! Remove the code that we just added to the CSS, we surely don't want to keep that.
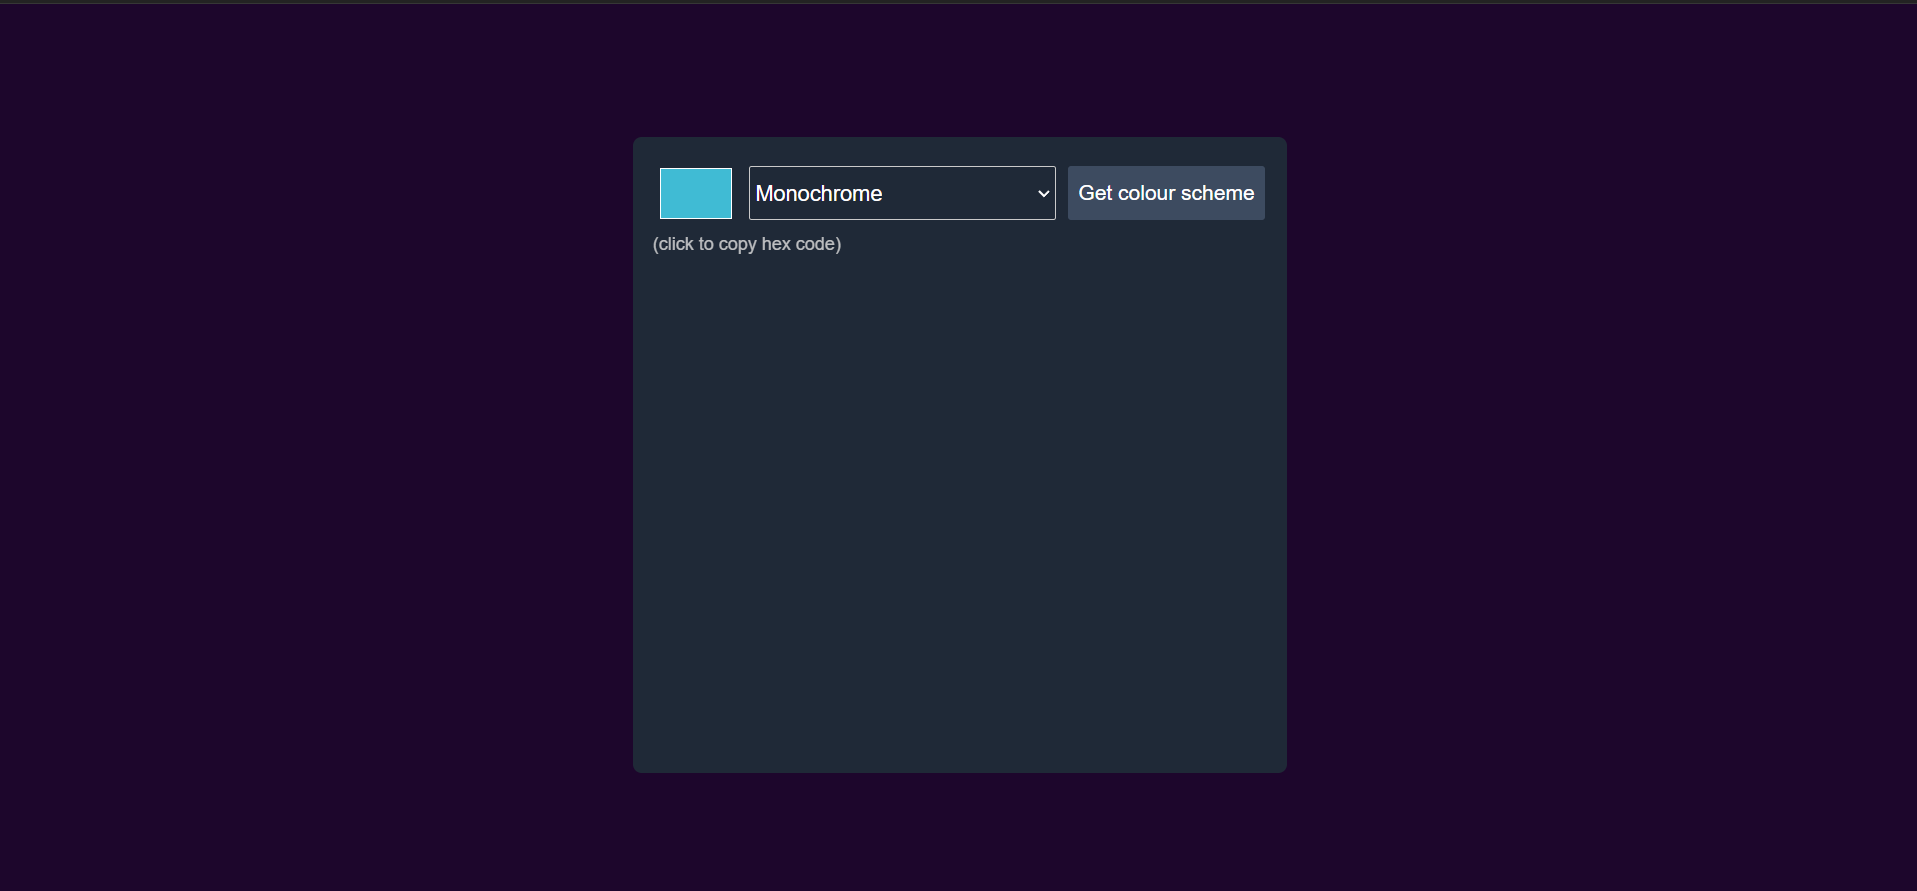
Gotta Make It Look Good!
Now let's head over to the .css file. For this website, I've used flexboxes because they are responsive and are thus a very good tool for layout. We'll change the box-sizing to border box to avoid confusion and reduce potential bugs that we may get. I decided that I wanted the generator to cover 65% of the page's height and 32% of the width for regular large screens. Since the colour schemes that we get from Color API consist of 5 colours, we'll make 5 placeholders for displaying those colours and also their hex codes. Here is the code in my styles.css file:
html{
    height:100%;

}

body{
    box-sizing: border-box;

    height:100%;
    background:#1d062c;
    display:flex;
    align-items: center;
    justify-content: center;
    margin:0;
    padding:0;
    color:white;
    font-family: sans-serif;


}

#mainthing{
    background: #1F2937;
    display:flex;
    flex-direction: column;
    padding:1.25em 1em 1.25em 1em;

    width:32%;
    height:65%;
    min-height:60%;
    border-radius:7px;
}
#huh{
    overflow:hidden;
    width:100%;
    z-index: 1;
    height:13%;
    align-items: flex-start;
    justify-content: center;
}

  /*God bless the guy on Stackoverflow who showed me
 how get a good-looking colour input field*/
input[type=color]{

    width: 65px;
    min-width: 65px;
    height: 7vh;
    border:none;
    background: none;

}
input[type="color"]::-webkit-color-swatch {
    border: 0.1em solid white;

}

input[type="color"]:hover {
    cursor: pointer;
}


select{
    font-size:1.09em;
    background: #1F2937;
    border-color: #cacaca;
    color:white;
    height:6vh;
    width:50%;
    border-radius:2px;


}


#thisform{
    display:flex;
    align-items: center;
    justify-content: center;

}

.form-item-not-first{
    margin-left:2%;
}

input[type="button"]{
    height:6vh;
    font-size:1.05em;
    border-radius:2.5px;
    border-color:transparent;
    color:white;
    background: #3D4B60;


}
input[type="button"]:hover{
    cursor:pointer;
}


#sometext{
    height:4%;
    font-size:0.9em;
    color:rgb(219, 219, 219);
    padding-bottom:4px;
    opacity: 85%;
}
#heh{
    overflow: hidden;
    height:85%;
    display:flex;
    z-index: 0;

}
#hah{
    height:3%;
    overflow:hidden;
    display: flex;


}

.colors{
    overflow:hidden;
    width:20%;
}
.colors:hover{
    cursor:pointer;
}


.hex{
    text-align: center;
    font-size:0.6em;
    padding:3px;
    width:20%;
    opacity: 85%;

}
.hex:hover{
    cursor:pointer;
}
God bless the guy on Stackoverflow who showed me how get a good-looking colour input field.
Here's what your page should look like at this stage:
 We haven't added media queries yet. We'll do that later
Gotta Make it Work!
Now for the juicy part. What we need is to fetch data from the Color API. We will ask the user to select a colour and the type of scheme (Monochrome, Monochrome-dark, Monochrome-light Analogic, Complement, Analogic-Complement and Triad) they want. We will the give these two pieces of information to The Color API and ask it to deliver the required colour scheme. The response we get will be in the form of a json file. We will use .json() for converting it to a JavaScript object. We want to do all this when we click the get colour scheme button
crow.addEventListener("click", checker)
//crow is the name of id of the button, checker is the name of the function
//that we want to call
function checker(){
const colour= document.getElementById("seed-color").value.substring(1)
const mode= document.getElementById("color-scheme").value.toLowerCase()
fetch(`https://www.thecolorapi.com/scheme?hex=${colour}&mode=${mode}`)
    .then(response=>response.json())
In the above code snippet, fetch is a an API (Application Programming Interface) that is used to request information from a server. Fetch returns a promise. This promise can either get fulfilled or rejected. To indicate what needs to be done once the promise gets fulfilled , we use .then. You'll notice that there are actually 2 .then lines. This is because the first .then is used to get an overview of the data that got fetched, if we do not modify it. So we use .json() in order to extract the useful 'body' of the data in the form of a JavaScript object. One .then returns its value to the next .then.
fetch(`https://www.thecolorapi.com/scheme?hex=${colour}&mode=${mode}`)
.then(response=>console.log(response)
//If we console.log the response, this is what we get:
Response {type: 'cors', url: 'https://www.thecolorapi.com/scheme?hex=40bbd4&mode=monochrome', redirected: false, status: 200, ok: true, …}
body: ReadableStream
bodyUsed: false
headers: Headers
[[Prototype]]: Headers
ok: true
redirected: false
status: 200
statusText: "OK"
type: "cors"
url: "https://www.thecolorapi.com/scheme?hex=40bbd4&mode=monochrome"
[[Prototype]]: Response
The second .then is used to write what is to be done using that object.
fetch(`https://www.thecolorapi.com/scheme?hex=${colour}&mode=${mode}`)
    .then(response=>response.json())
    .then(data=>console.log(data))
//if we console.log now, ie. after converting the body to a JavaScript object, this is what we get:
{mode: 'monochrome', count: 5, colors: Array(5), seed: {…}, image: {…}, …}
colors: (5) [{…}, {…}, {…}, {…}, {…}]
count: 5
image: {bare: 'https://www.thecolorapi.com/scheme?format=svg&named=false&hex=40BBD4&mode=monochrome&count=5', named: 'https://www.thecolorapi.com/scheme?format=svg&hex=40BBD4&mode=monochrome&count=5'}
mode: "monochrome"
seed: {hex: {…}, rgb: {…}, hsl: {…}, hsv: {…}, name: {…}, …}
_embedded: {}
_links: {self: '/scheme?hex=40BBD4&mode=monochrome&count=5', schemes: {…}}
[[Prototype]]: Object
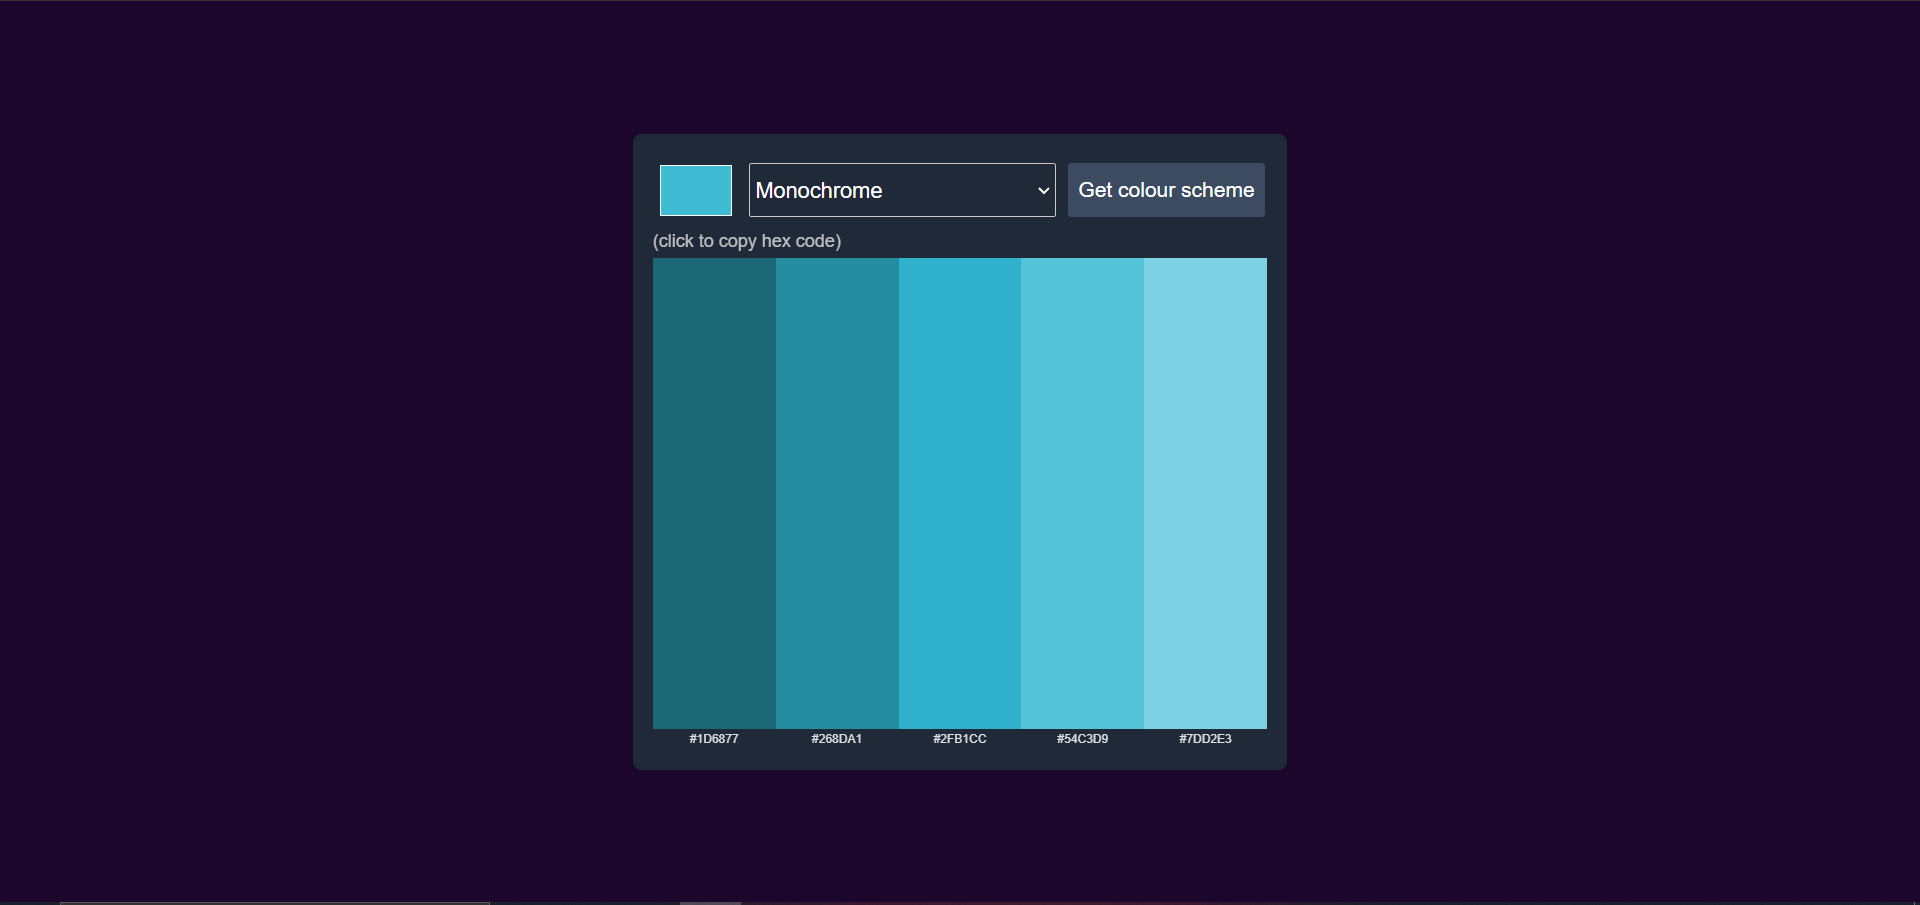
I used a for loop to display the colours and their hex values. This is where the ids of our divs come into play!
.then(data=>{
        arr=[]
        for (let i=0;i<5;i++){
            document.getElementById(`c${i}`).style.background=data.colors[i].hex.value
            document.getElementById(`h${i}`).textContent=data.colors[i].hex.value
In the first iteration of the loop, our code will set the background of our div with id "c0" to the hex code that is the first element in the array "colours" which is a part of our data object. It will also change the textContent of the div with id "h0" to the same hex code. In the second iteration, the background of c1 will get changed to the second element in the colours array and so will the textContent of h1. This will keep going on till we reach the c4 and h4.
Now we also want to be able to copy the hex value of the colours generated. We can do so by adding an event listener to all the placeholders and using navigator.clipboard.writeText.
document.getElementById(`c${i}`).addEventListener("click", ()=>{
            navigator.clipboard.writeText(data.colors[i].hex.value)
        })
        document.getElementById(`h${i}`).addEventListener("click", ()=>{
            navigator.clipboard.writeText(data.colors[i].hex.value)
        })
The final code will look like this:
let arr=[]
checker()


crow.addEventListener("click", checker)
function checker(){

    const colour= document.getElementById("seed-color").value.substring(1)
    const mode= document.getElementById("color-scheme").value.toLowerCase()
    fetch(`https://www.thecolorapi.com/scheme?hex=${colour}&mode=${mode}`)
    .then(response=>response.json())
    .then(data=>{
        for (let i=0;i<5;i++){
        document.getElementById(`c${i}`).style.background=data.colors[i].hex.value
        document.getElementById(`h${i}`).textContent=data.colors[i].hex.value
        document.getElementById(`c${i}`).addEventListener("click", ()=>{
            navigator.clipboard.writeText(data.colors[i].hex.value)
        })
        document.getElementById(`h${i}`).addEventListener("click", ()=>{
            navigator.clipboard.writeText(data.colors[i].hex.value)
        })
            }

        }
    )

}
Our webpage should now be looking like this:
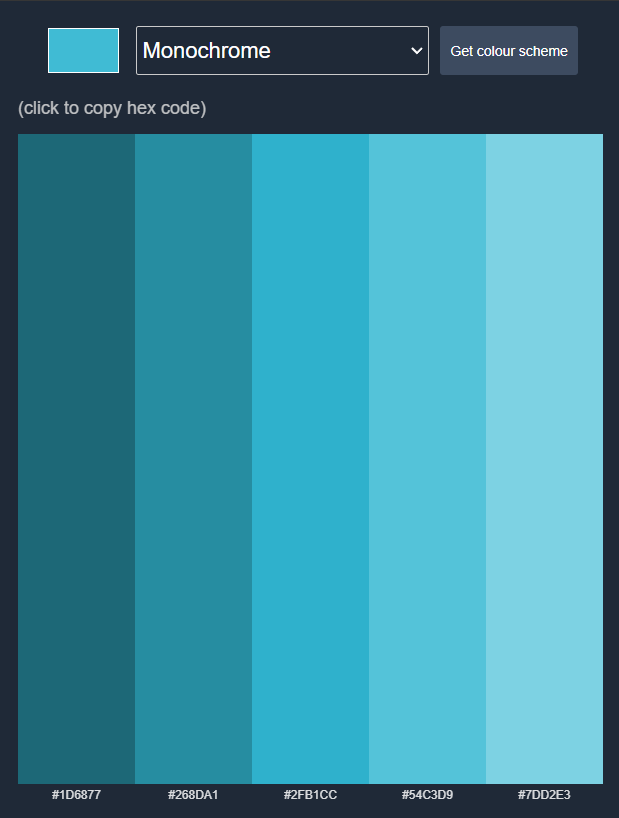
Media Query
Now for making our generator look good on mobile devices as well. I decided that I wanted the generator to cover most of the screen. So I gave it a height and a width of 95%. According to how that turned out, I made changes to the other elements as well. Add the following code to the end of your CSS file:
@media(max-width:900px){

    body{
        overflow:hidden;
    }
    #mainthing{
        width: 95%;
        height:95%;
    }


    input[type="button"]{
      min-height:100%;
      font-size: 0.7em;
    }

    select{
        min-height:100%;
        font-size:1.1em;

        }
    input[type=color]{
        min-height:100%;

    }

    #huh{
        height:10%;
    }
}
Here's how our site will look like on mobile devices:
Conclusion
That's it! We have successfully created a colour scheme generator using HTML, CSS and Vanilla JS, all thanks to the power of The Color API! Here's the link to the one that I've deployed: Colour Scheme Generator. Feel free to play around and mess with it.
Thank You
 Thank you so much for reading to the end! I hope you enjoyed reading and learnt something new. Do let me know how you feel about this blog in the comments. Once again thanks a lot, I really appreciate and value your time. See you in the next blog 🙋♂️🙋♂️


