
Creating Amazing AI-powered Nextjs Projects with OpenAI's API
In my case, it is a web app that recommends games / movies / songs / food / books based on the user's current taste


Introduction
If you've been active on social media recently, I'm sure you've come across ChatGPT and OpenAI. If you tried it out yourself, I'm sure you got amazed too, just like I did! In this blog, I'll be covering how you can use OpenAI's API to use GPT-3 in your apps and produce pleasantly surprising results. Huge shoutout to buildspace for encouraging us to build our own thing instead of just following along with their tutorial on the same. Also for providing a boilerplate codebase in which a lot of the styling has also been done for us.
We are gonna be using Nextjs to build our app. I'm not going to be covering the styling part for the scope of this tutorial. Here is the link to the finished project, feel free to copy all the CSS from it. Keep in mind that I've used TailwindCSS in some places.
What even IS this GPT-3 thing?
GPT stands for generative pre-trained transformer. Woah those are some heavy words, aren't they? Let's break the term down a bit:
Generative: In the given context, generative just means that the AI is capable of using pre-existing content to create, ie. generate new content.
Pre-trained: The model has already been "trained". This means that it has already analyzed a bunch of data and is ready to give you some results based on its training.
Transformer: In simple terms, a transformer is a way for a computer to understand and generate natural language
For this build, we'll be using OpenAI's latest GPT-3 model, which is text-davinci-003
Let's get started!
Firstly, fork this GitHub repository to add it to your account. Once you've done that, click the dropdown which says 'code' and copy the HTTPS link. Open your IDE and run the following commands in the terminal
git clone (the_copied_link)
cd gpt3-writer-starter
npm run dev
Open up a browser window and navigate to localhost:3000. You should see something like this:

What're we cooking though?

Here's what we're gonna be building - an app that uses GPT-3 to give the user recommendations about songs, games, movies, books and food based on what they currently like. Without further ado...
Let's get building!
Imports
Let's import some stuff we're gonna need (in the index.js file)
import { useState, useRef, useEffect } from "react";
import Typical from "react-typical";
Here, useState, useRef and useEffect are React Hooks and Typical is a React library that can be used to animate text.
Initializing variables
Cool! Now let's initialize some state variables inside the Home function
 const Home = ()=>{
  //add these:
  const [userInput, setUserInput] = useState(""); //1
  const [apiOutput, setApiOutput] = useState(""); //2
  const [isGenerating, setIsGenerating] = useState(false); //3
  const [choice, setChoice] = useState("Songs");//4
  const [theText, setTheText] = useState("")//5
  const scrollToRef = useRef()//6
Let me explain line-by-line what these variables are for
userInputis for storing whatever the user enters in our text field.setUserInputis used for changinguserInput. We'll connect it to our form via a function so that it is in charge of the value of the form. We have first set it to""so that the text field remains empty. This will become more clear when we get to the text field part of this app.apiOutputis for storing whatever data OpenAI's API sends back to us andsetApiOutputis just its setter function.isGeneratingis a boolean that we will change to true when the AI is generating the output (basically, loading) andsetIsGeneratingis its setter function.
choiceis used to store what the user selects as his choice from the list of movies, games, food, books and songs.setChoiceis its setter function.theTextis just something I used to make the text animation run only once.setTheTextis its setter function. More about this when we got theuseEffectpart.scrollToRefis ref that I created so that the webpage scrolls down a bit when the output is generated. Otherwise, the user would think that it didn't work because he won't be able to see it lol.
Putting useEffect to some good use
  useEffect(()=>{
    setTheText(<Typical steps={["Song",2000,"Movie",2000,"Game",2000,"Book",2000, "Food", 2000]} loop={Infinity} wrapper="span"/>)
    console.log(theText)
    }, [])
useEffect with an empty dependency array means that it will only run once that is when the webpage is first loaded. I'm changing the value of theText via setTheText here. I had to use a state variable because regular variables' scope was limited to the useEffect and I wasn't able to use them outside of it. What I'm basically doing here is that I'm making sure that any other changes in the app aren't affecting the text animation. For example, If I changed something in the text field, it would cause re-renders which would further cause the animation to misbehave. We don't want that now do we?
The API call
Awesome, awesome. It's going great so far. Now copy and paste this code right after the previous snippet
  const callGenerateEndpoint = async () => {
    setIsGenerating(true);
    console.log("Calling OpenAI...");
    const response = await fetch("/api/generate", {
      method: "POST",
      headers: {
        "Content-Type": "application/json",
      },
      body: JSON.stringify({ userInput, choice } ),
    });

    const data = await response.json();
    const { output } = data;
    console.log("OpenAI replied...", output.text);

    setApiOutput(`${output.text}`);
    setIsGenerating(false);
    scrollToRef.current.scrollIntoView()
  };
This part will look very familiar to you if you've worked with APIs before. We're calling a function (callGenerateEndpoint) which first sets generating to true so that we can render a custom loader in place of the text of the generate button and disable this button, then we are sending a request to our API endpoint, which also contains the userInput and the choice. We're asking the endpoint for some data after it is done processing it. (don't worry about the fetch for now, we'll set it up later). We get this data back and we store it in a variable of the same name. Then we destructure this data object for its output property. We then set apiOutput to output.text. This output.text is what we actually need. Finally, we set isGenerating to false to get our "generate" button's text back and also enable said button. The scrollToRef is just for the aforementioned reason, we just want the webpage to scroll down a bit when the output is generated.
Some more functions
  const onUserChangedText = (event) => {
    console.log(event.target.value);
    setUserInput(event.target.value);
  };

  const handleChange = (event) => {
    setChoice(event.target.value);
    setUserInput("")
    console.log(choice);
  };

  const Submit = (event) =>{
    if (event.ctrlKey&&event.keyCode==13){
      callGenerateEndpoint()
    }
  }
onUserChangedText is the function that is responsible for changing userInput every time the user enters a character. This is actually the second piece to a three-piece puzzle. Once we get to the textarea element, everything is gonna fall into place.
handleChange is the function responsible for changing the value of choice whenever the user changes their choice (books / movies / food / games / songs). As soon as it detects that a person has changed their choice, it clears the textarea field as well.
Submit is something I wrote just so that I could add the functionality to call the callGenerateEndpoint function whenever the user presses ctrl + Enter.
Render it out!
return (
<div className="root">
<Head>
<title>AI-dvisoor</title>
</Head>
<div className="container ">
<div className="header">
<div className="header-title ">
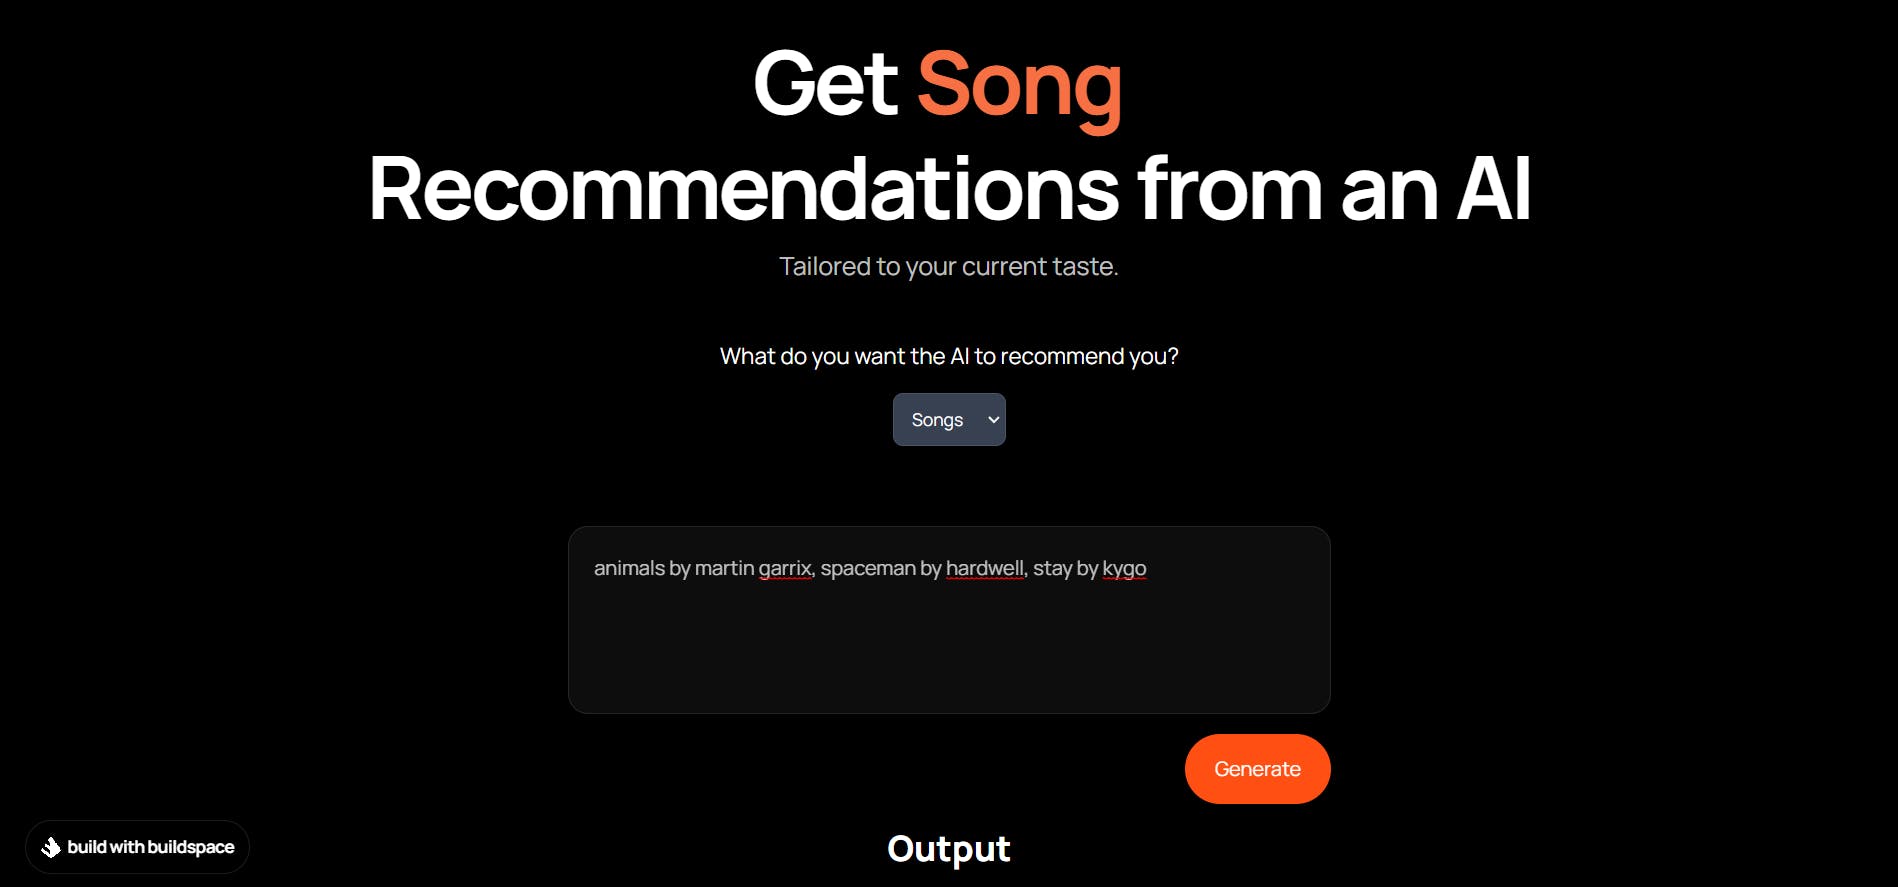
<h1>
Get{" "}<span className="text-[#f77043]">{theText}</span>
{" "}
<br />
Recommendations from an AI
</h1>
</div>
<div className="header-subtitle mt-2">
<h2>Tailored to your current taste. </h2>
</div>
</div>
<div className="text-[white] text-lg -mt-5 -mb-12">
What do you want the AI to recommend you?
</div>
<div className="selector">
<select
className=" hover:cursor-pointer bg-gray-50 border border-gray-300 text-gray-900 text-sm rounded-lg focus:ring-blue-500 focus:border-blue-500 block w-full p-2.5 dark:bg-gray-700 dark:border-gray-600 dark:placeholder-gray-400 dark:text-white dark:focus:ring-blue-500 dark:focus:border-blue-500"
value={choice}
onChange={handleChange}
>
<option>Songs</option>
<option>Movies</option>
<option>Games</option>
<option>Books</option>
<option>Food</option>
</select>
</div>
<div className="prompt-container ">
<textarea
placeholder={`enter some ${choice.toLowerCase()}${choice =="Food"?" items":""} you like ${
choice == "Songs"
? "(if possible, mention their artists too)"
: ""
}`}
className="prompt-box"
value={userInput}
onChange={onUserChangedText}
onKeyDown={Submit}
/>
<div className="prompt-buttons">
<a
className={
isGenerating ? "generate-button loading" : "generate-button"
}
onClick={callGenerateEndpoint}
>
<div className="generate">
{isGenerating ? (
<span className="loader"></span>
) : (
<p>Generate</p>
)}
</div>
</a>
</div>
<div className="output">
<div className="output-header-container">
<div className="output-header">
<h3>Output</h3>
</div>
</div>
<div className="output-content">
<p>{apiOutput}</p>
</div>
</div>
<div ref={scrollToRef} className=" select-none">You weren't supposed to find this!</div>
</div>
</div>
<div className="badge-container grow" >
<a
href="https://buildspace.so/builds/ai-writer"
target="_blank"
rel="noreferrer"
>
<div className="badge">
<Image src={buildspaceLogo} alt="buildspace logo" />
<p>build with buildspace</p>
</div>
</a>
</div>
</div>
);
};
export default Home;
Pretty basic stuff here, mostly. If you are confused about the things wrapped in {} they are just the things that are processed by JS first and don't straightaway get rendered. For example <div>Hello</div> will render out a div with the text "Hello". However <div>{Hello}</div> will try to find a function/variable in our JS code with the name "Hello". If it doesn't find any, it will give an error.
One thing I must explain here though is the textarea. Its value property gets its value from userInput, which is initially an empty string. Its onChange property listens for changes that are made to the area, so whenever a user enters / deletes characters, onChange runs the function that is specified as its value. In this case, it runs the onUserChangedText function, which in turn changes the userInput. This ultimately causes our component (Home) to re-render and now that the value of userInput has changed, so has the value of the textarea. So basically our React component has taken complete control of our textarea. Isn't that cool af?!
But, where is our apiOutput coming from? Well ,well -
Now for the magical stuff ✨✨

(I'm so sorry for making this lol)
Setting things up
If you don't already have an OpenAI account, go ahead and create one using this link. Then create an API key from here. Now, we want to use our OpenAI API key to put in a prompt and get a response. Now, we can't do this directly from our frontend because that would expose our API key to the user, which is definitely not good. This. This point precisely is where Nextjs comes in as a saviour and makes things super easy for us. With Nextjs, we can create an API endpoint right inside our app.
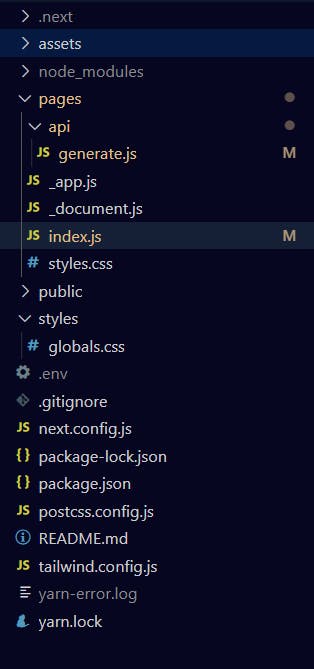
Go ahead and create a new file called .env in the root of your project. This will allow us to create environment variables. Also, make a new directory called api inside your pages directory. In your new api directory, create a file called generate.js. Here's what your folder structure should look like now:
Configuring the environment variable
Go the .env file and add your API key there (without quotes)
OPENAI_API_KEY = your_api_key
Let the magic begin!
Go the generate.js file.
We have to create an OpenAIApi object with a configuration which requires our API key. Like so:
import { Configuration, OpenAIApi } from 'openai';
const configuration = new Configuration({
  apiKey: process.env.OPENAI_API_KEY,
});
const openai = new OpenAIApi(configuration);
In the snippet below we are specifying what goes before and after the user input
const basePromptPrefix = "A person who likes ";
const basePromptSuffix=" will also like these 5 "
Now it's time to write an async function with all the logic and export it
const generateAction = async (req, res) => {
  console.log(`API: ${basePromptPrefix}${req.body.userInput}${basePromptSuffix}${req.body.choice}: `)

  const baseCompletion = await openai.createCompletion({
    model: 'text-davinci-003',
    prompt: `${basePromptPrefix}${req.body.userInput}${basePromptSuffix}${req.body.choice}: `,
    temperature: 0.7,
    max_tokens: 250,
  });

  const basePromptOutput = baseCompletion.data.choices.pop();

  res.status(200).json({ output: basePromptOutput });
};


export default generateAction;
For our convenience, we are logging what is getting sent to OpenAI. Here is what it looks like:
A person who likes (textarea input) will also like these 5 (choice)
This acts as a prompt for GPT-3 and it generates output based on this single line. This one line is the most important line in our code. We have to test out different prompt and see what works best for us.
We are storing the output in a variable called baseCompletion. However, GPT-3 is actually returning an array of results. That is why we have used .pop() to get the top-most (last) result in the array and storing it in basePromptOutput. We are then sending a response to our app with the status 200, which means that the request was completed successfully. We are passing our app an object which has the output property with the value basePromptOutput.
However, the result stored in basePromptOutput is an object itself and what we really care about is its 'text' property. That is why, back in our app, we have used output.text. Here's a quick refresher:
    console.log("OpenAI replied...", output.text);

    setApiOutput(`${output.text}`);
This might come as a shock to you but...
That's it! All the hard-work has already been done by OpenAI! We don't need to train the model, we just need to see the output it produces. We are just making our app serve a more specific purpose and provide a clean interface to the user, with clear headings and sub-headings which make it easy to understand what the app is all about. Again, here is the link to the finished project's GitHub repo in case you missed something.
Thank You!
Thank you so much for reading this blog to the end! I hope you learnt something new and took something valuable away from it! See you in my next build.
Special Thanks
buildspace: For making the tutorial and then encouraging us to do something different and not just copy what they are doing
Sahil: A senior from my college who built a very cool project called "GiftHub" using GPT-3, which inspired me to build one myself. Here is the link to his project.